Enhancing Colors in Adobe Lightroom
Editing images in adobe lightroom is skill of art. One can master it only when technical side of it is well understood. In this blog we will try to understand the power of photo editing using adobe lightroom, with an example of one of my holi images.
Here is the RAW image before we kick in with the edit.

Let me be clear with the intent of this shot. The man in the center grabbed my attention here while clicking this image. The colors thrown here at Nandgaon, India are crazy and one can hardly see anything when it is happening at its peak. No wonder this man seems to have seen lot of such Holis and thus completely fearless in the situation. I named this image as “Fearless Walker”.
Coming back to the editing part, as a first impression towards the raw image, this image lacks lot of contrast. The highlight area seems little overexposed and the focus on my main subject seems to be missing. Also I really want this image to look vibrant and painting like. So let’s begin !
Have you noticed that I prepared my mind with some intent before even starting with the edit ?
Lets start with some basic corrections.
Basic Exposure Corrections in Adobe Lightroom
With every image, I generally start with basic exposure corrections. Most of the professional photographers will recommend to start with these.
Following are the settings which are part of Basic Pannel in Adobe Lightroom :
White Balance
Exposure
Contrast
Highlights
Shadows
Whites
Blacks
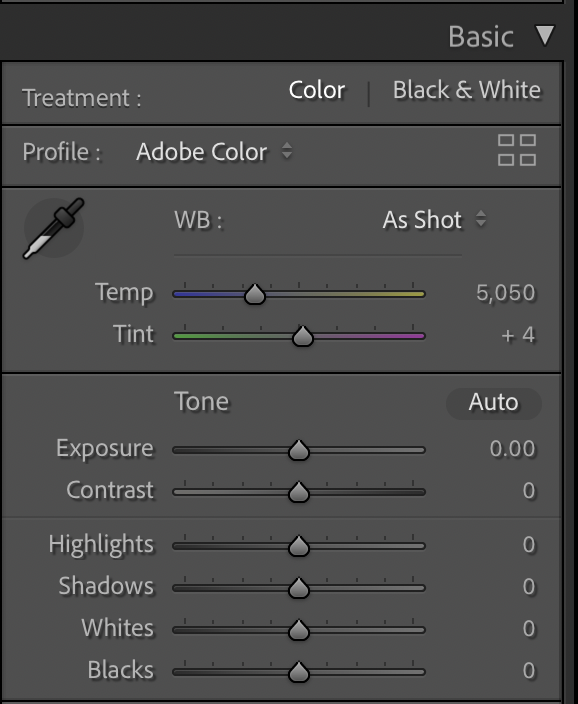
For this particular image, I went with following to get the desired result with basic panel, and the result is already looking great.
To compensate for overexposed image, I have reduced the exposure a bit followed by -ve highlights.
Then created a white point and black point in the image using whites & blacks slider. This added a good contrast in the image.
Later added some global contrast as well using contrast slider.

We can already see boost in colors but I am still not satisfied. I want to play with individual colors and want more control over the image. Thats where the HSL pannel of Adobe Lightroom comes in play.
Hue-Saturation-Luminance/HSL Pannel in Adobe Lightroom

At first HSL pannel might look overwhelming and one can easily ignore its power. However the right knowledge about this pannel will take your photo editing workflow to the next level. HSL pannel is meant for selective color editing. One can easily change the hue, saturation or luminance of 7 colors through this pannel.
Hue : Hue slider helps to adjust the tonal range of the selected color. By changing the hue of the color, one can replace the color with its neighbour in the color wheel. The sliders are pretty self explanatory. For example, Yellow color will change to orange if moved towards -100 or will change to green if moved towards +100 and so on.
Saturation : Saturation is all about intensity of the color. One can enhance the particular color in the image to showcase the vibrancy and mood in particular part of the photograph. For this holi image, I intentionally boosted reds, oranges and yellows through saturation. The reason for going this saturation enhancement method against the global saturation in basic pannel is that global saturation would have increased the color intensity of each colors to the same degree. However, HSL pannel is helping with more control on each color separately.

Luminance : Luminance is all about intensity of light in any particular color. By increasing or decreasing the intensity of light one can increase or decrease the light in particular color. This can be used to make the particular image look darker or brighter in the image. I want more focus on the man in the centre. Since he is wearing reds, I went ahead with increasing reds luminance a bit. Here is how it looks. Very small adjustment but worth doing it.

Things looking good till here. Lets just add a little bit of global vibrance and saturation with -ve texture. Texture slider plays with the texture of the image. I am purposefully going -ve here to give a painting like effect. Notice how the edges of the subjects are appearing smooth. The change is subtle yet very effective. Try it in your images.

I am happy with the image till here. But to take it a step further, I feel I am still lacking a focus on my subject. The highlights around my subject are still dominating. So I should go ahead with selective masking. For this scenario, lets choose radial masking. Notice I have inverted the mask as I want to make changes in surrounding area of my main subject.

Next, lets reduce the exposure and texture of the surrounding area. This will bring in more focus on our main subject.

Finally ending the image with bit of sharpening and noise reduction.

While all these changes seemed to be very subtle and minimalist, there is significant change from where we have started to where we have reached. This is exactly what the technical understanding of lightroom is. One needs to avoid over processing of the images, especially which includes colors, unless intended to have such effects of dominating colors in final version.

If you want to learn and watch such photography related stuff, you can subscribe to the YouTube channel where I talk about photography stuff in simplest form.